Official Luthiers Forum!
http://www-.luthiersforum.com/forum/

Ebony fretboard filler? pics
http://www-.luthiersforum.com/forum/viewtopic.php?f=10102&t=11204
Page 1 of 1

Author:  robertD [ Tue Mar 06, 2007 11:54 pm ]
Post subject: 

Hello All,

while attempting to prepare an inlay for a pearl dot on the fretboard, I bumped the dremel as I
was trying to turn it off. This of course caused a slight gouge. (I wont make that mistake again)

I was supposed to just have to use a brad point drill bit to create the cavity for the pearl
dot. For some reason, this dot that goes between 4th and 5th fret measures 7mm. I’ve tried many
times in the past to find drill bits sized in millimeters locally to no avail. Much less a brad point.
As for the rest of the dots, no problem. I have the bits for them.
Anyway, I thought I would give it try, and router a circle for the dot. I needed the practice,
since I plan on inlaying the peg head with a custom made inlay.

So, though it’s a very, very small area, I’m sure it will need to be filled.

What do you all like to use when you’re filling an Ebony fretboard around a white pearl dot?

Thanks for listening,

Robert

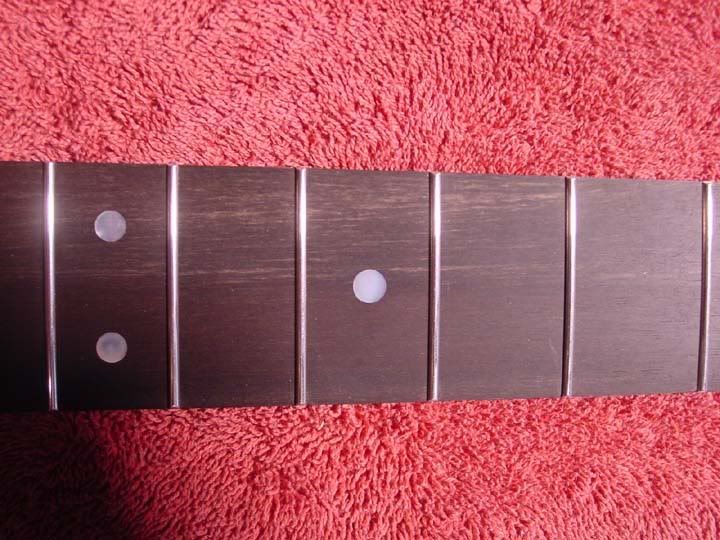
Here's a couple of pics of the fretboard and dot.

What the pics don't show is the router went ever so slightly outside of the desired cut, which I
believe also necessitates the need for filling.

And, as you can see, (or least I think you can see), the gouge is very small.


Author:  Kim [ Wed Mar 07, 2007 12:02 am ]
Post subject: 

Use a file to make some ebony dust, don't use abrasive paper as it will contaminate the ebony dust with particles. Mix the clean dust with regular epoxy and load the divot. Next day scrape level with a single edged razor or a piece of broken glass.

Cheers

Kim

Author:  old man [ Wed Mar 07, 2007 6:00 am ]
Post subject: 

I do what they said, but you could also just put a tiny drop of CA in the gap and hit it with 400 grit and that will work well.

Ron

Author:  Martin Turner [ Wed Mar 07, 2007 8:48 am ]
Post subject: 

I use 5 minute epoxy mixed with ebony dust. Whenever Im sanding a fretboard I collect the dust for future use. Its also great on your face if you ever decide to join the Marines.

Notes:

1. The dust will slightly shorten setting time for some 5 minute epoxies.
2. Dont fill all the holes with epoxy and then proceed top instal the dots...by the time you reach the last hole the epoxy will be hard. Do one or two dots at a time.
3. When scraping down I use a cabinet scraper and then finish off with sand paper....sanding only is ok but be careful as sandpaper tends to favour the softer ebony fretboard around the marker while a scraper will preferentially attack the marker and epoxy.

Cheers Martin

Author:  robertD [ Fri Mar 09, 2007 9:57 pm ]
Post subject: 

Thanks Everyone,

I'm going to try the CA method.

Let you know how it works out.

Thanks Again

Author:  robertD [ Wed Mar 14, 2007 9:59 pm ]
Post subject: 

Thanks to all your advise, the pearl dot mishap has been resolved!

Martin and Ron, I combined your methods. I made a mixture of CA and Ebony dust to a pasty
consistency. I’m very pleased with the way it looks.

Thanks again, Robert


Before


After

Author:  Pwoolson [ Wed Mar 14, 2007 10:54 pm ]
Post subject: 

Robert, for future reference, you want to aviod "mixing" CA and ebony dust. It will likely start to set up before you get a chance to get it in the void. I think you got lucky this time. I just push ebony dust into a crack like that then wick in thin CA over it.

Author:  robertD [ Fri Mar 16, 2007 12:22 am ]
Post subject: 

Paul, Thank you so much for your advise. However, I’d like to tell you, that it worked very well.

This is what I did;

I took a small pile of ebony dust,(about a 1/4" high, and ?" wide) placed it on my marble slab.
Put one drop of CA (Superglue?), then mixed it rapidly for approximately 15 seconds, then very quickly
placed it into the divot, and cracks. This took about 20 seconds. After roughly 2 minutes it was
ready for shaping and sanding. I’d say that the whole process took about 10 to 15 minutes to complete.
In fact, it worked so well, that I tried it a second time filling around some of the other dots.

Thanks again, Robert

Author:  LouisianaGrey [ Sat Mar 17, 2007 11:31 pm ]
Post subject: 

In my experience different brands of CA go off at different speeds. I think Paul's right and you got lucky. I've tried the premixing and succeeded, tried it other times and the dust has turned the superglue solid almost instantly, so nowadays I pack the dust in the gap and then add the superglue.

Author:  1bordeaux [ Sun Mar 18, 2007 4:54 am ]
Post subject: 

I have suffered the same results using pre- mixing with CA,(going off too quickly to work with).

Now, I'll pack the area with dust, wick in thin visc. CA, then repeat as neccesary.

So long as you're happy with the results, it's the "right" way

Author:  CarltonM [ Sun Mar 18, 2007 6:51 am ]
Post subject: 

I read an interview with the head of the company that makes Hot Stuff brand glue. He said that CA glues don't lose their strength as they age, just their quick drying ability. I've found that to be true, at least in one respect. I've got some old thin CA that only dries to a "gummy" stage; however, if I add some accelerator it seems to dry and hold as if it were fresh. Perhaps Robert's glue is just a bit past "fresh," and dried slowly enough to work in this instance.

Author:  robertD [ Sun Mar 18, 2007 10:38 pm ]
Post subject: 

Thanks guys,

The more I hear from you, the more I learn.

I hadn’t thought about the “AGE” factor. Maybe, I did get a little lucky, in that, I purchased a
bottle that had been on the shelf for a while. Not to mention, that I bought it back in July 2006.

Robert

Author:  Barry Daniels [ Tue Mar 20, 2007 8:21 am ]
Post subject: 

That is old CA glue. Fresh stuff is so hot that smoke comes out when you apply it to sawdust.

Page 1 of 1 All times are UTC - 5 hours
Powered by phpBB® Forum Software © phpBB Group
http://www.phpbb.com/